
Installing laminate flooring may sound like a job that requires expensive tools and professional experience. Many homeowners delay upgrading their floors because they believe the process is complicated or costly.
The truth is that modern laminate flooring systems are designed to be beginner friendly.
If you are willing to spend a weekend learning the basics, you can install laminate flooring in your home without professional tools. Most of the work involves measuring, cutting, and clicking the boards together. With a little patience and preparation, the results can look just as impressive as professional installations.
Let’s see how to install laminate flooring without professional tools, using simple items that many homeowners already have in their garage or toolbox.
Why Laminate Flooring Is Perfect for DIY Projects
Laminate flooring has become one of the most popular flooring choices for homeowners because it combines affordability with durability. The boards are designed with a click lock system, which means they snap together instead of requiring nails or glue.
That design is exactly what makes laminate flooring ideal for beginners. Instead of using complicated equipment, most installations can be completed with basic tools such as a tape measure, utility knife, rubber mallet, and a simple hand saw.
Another advantage is that laminate flooring floats above the existing floor. This means you usually do not have to remove the original flooring underneath. As long as the surface is flat and clean, laminate boards can often be installed directly over materials like vinyl, plywood, or tile.
Because of these features, many homeowners complete their laminate flooring installation in a single weekend.
Tools You Can Use Instead of Professional Equipment
Professional installers often use specialized tools like flooring nailers or electric saws. However, these tools are not required for laminate flooring installation.
Here are common household tools that work perfectly for this project:
- Tape measure
- Carpenter pencil or marker
- Utility knife
- Hand saw or basic circular saw
- Rubber mallet
- Spacers or small pieces of wood
- Pull bar or flat pry bar
- Safety gloves and eye protection
If you do not have spacers, you can simply use small pieces of cardboard or scrap wood to maintain the expansion gap between the flooring and the wall.
The key point is that laminate flooring installation focuses more on careful measurement than expensive equipment.
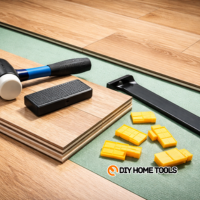
You do not need expensive professional equipment to install laminate flooring. However, having a small flooring installation kit can make the process much easier and prevent damage to the boards during installation. Many DIY homeowners use a simple kit like the one below because it includes the essential tools needed to tap boards into place, maintain expansion gaps, and finish the job more efficiently.
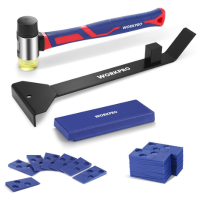
- 17\” heavy duty pull bar helps lock boards tight near walls
- Fiberglass mallet delivers controlled taps without damaging edges
- Solid tapping block protects click-lock joints during install
- 40 spacers keep the expansion gap consistent around the room
Step 1: Prepare the Room Properly
Preparation is one of the most important parts of installing laminate flooring. Skipping this step often leads to uneven floors or boards that shift later.
Start by removing furniture, rugs, and any obstacles from the room. The workspace should be completely clear.
Next, inspect the subfloor carefully. Laminate flooring requires a flat and stable surface. Small imperfections are acceptable, but large bumps or dips should be fixed.
You can level minor bumps with sandpaper or a hand sander. For deeper gaps, a simple floor leveling compound can help create a smoother surface.
Once the floor is level, vacuum or sweep the area thoroughly. Dust and debris trapped underneath laminate boards can create uneven sections later.
Finally, allow the laminate flooring boxes to sit in the room for at least 24 to 48 hours. This allows the boards to adjust to the room’s temperature and humidity.
Step 2: Install the Underlayment
Underlayment is a thin layer that sits between the laminate flooring and the subfloor. It provides cushioning, sound reduction, and moisture protection.
Some laminate flooring products already include attached underlayment. If your flooring does not include it, installing a separate underlayment is simple.
Roll the underlayment across the floor and cut it using a utility knife. The material should cover the entire floor area without overlapping sections.
Use tape to secure the seams if necessary. The surface should remain flat and smooth before installing the laminate boards.
This layer plays a significant role in preventing squeaky floors later.
Step 3: Plan the Layout Before Installing
One of the biggest mistakes beginners make is starting installation without planning the layout.
Laminate boards should run parallel to the longest wall in the room. This orientation usually creates the most natural visual flow.
Measure the width of the room and calculate how many rows of laminate boards will fit. If the final row ends up extremely narrow, you may want to trim the first row slightly to balance the layout.
This planning step helps create a cleaner and more professional looking finish.
Another useful tip is to stagger the board joints in each row. This pattern improves stability and gives the floor a more natural wood appearance.
Step 4: Begin Installing the First Row
Start installation along the longest wall in the room.
Place spacers between the laminate boards and the wall to maintain an expansion gap. Laminate flooring expands and contracts with temperature changes, so this gap prevents buckling later.
Connect the first two boards by inserting the tongue of one board into the groove of the next board at an angle. Then press the board downward until it locks into place.
Continue installing the first row across the wall.
If the final board in the row is too long, measure the remaining space and cut the board using a hand saw. The leftover piece can often be used to start the next row.
Step 5: Install the Remaining Rows
The second row is where the flooring begins to look more complete.
Start the row with a board that is shorter than the first row’s starting board. This creates the staggered pattern that improves structural strength.
Insert the board at an angle and click it into the previous row.
If the boards feel tight, gently tap them using a rubber mallet. Place a scrap piece of laminate between the mallet and the board to avoid damaging the edge.
Continue installing boards across the row until you reach the opposite wall.
Repeat the process row by row across the entire room.
The installation becomes faster once you establish a rhythm.
Step 6: Cutting Boards Without Power Tools
Many people assume power tools are required to cut laminate boards, but a simple hand saw works perfectly.
Mark the cutting line clearly using a pencil and ruler. Secure the board on a stable surface and cut slowly to maintain a straight edge.
A utility knife can also score the laminate surface before snapping the board along the line.
This technique works well for thinner laminate products.
If you need to cut around door frames or corners, carefully measure the shape and cut gradually. Taking your time during these cuts will help the final result look much cleaner.
Step 7: Installing the Final Row
The final row can sometimes be the most challenging because there is limited space to maneuver the boards.
Measure the remaining gap between the last installed row and the wall.
Cut the boards lengthwise to fit the space while maintaining the expansion gap.
Use a pull bar or flat pry bar to gently pull the boards into position and lock them with the previous row.
Once the final row is installed, remove the spacers around the room.
Step 8: Install Baseboards or Trim
After the laminate flooring is installed, the expansion gaps around the walls will still be visible.
This is where baseboards or quarter round trim become important. These pieces cover the gap and create a finished appearance.
You can reinstall the original baseboards if they were removed earlier, or install new trim for a fresh look.
Attach the trim to the wall, not the flooring. This allows the laminate boards to expand and contract freely underneath.
Common Mistakes to Avoid
Even simple flooring projects can run into problems if basic guidelines are ignored.
One common mistake is forgetting the expansion gap. Without this gap, laminate boards may buckle as they expand.
Another mistake is installing flooring over an uneven surface. Even small bumps can cause boards to shift or separate over time.
Rushing through measurements can also create noticeable alignment issues across the floor.
Taking extra time during preparation and layout will prevent most of these problems.
Is Installing Laminate Flooring Worth It?
For many homeowners, installing laminate flooring without professional tools becomes one of the most satisfying home improvement projects.
The process is relatively simple compared with other flooring types. Modern click lock systems remove the need for adhesives, nails, or complicated equipment.
With careful planning and patience, a beginner can achieve results that dramatically improve the look of a room.
The cost savings can also be significant. Professional installation fees often exceed the price of the flooring itself.
By completing the project yourself, you can upgrade your home while keeping the budget under control.
Final Thoughts: Door to Future DIY Projects
Learning how to install laminate flooring without professional tools opens the door to many future DIY projects. Once you understand the basic principles of measuring, planning, and assembling flooring boards, the process becomes surprisingly manageable.
Most homeowners discover that the hardest part is simply getting started. After the first few rows are installed, confidence builds quickly.
With the right preparation and patience, laminate flooring installation can transform a room and deliver a result that looks clean, modern, and professionally finished.